
TABLE OF CONTENTS
INTEGRATION SETUP
Install GCPay App in Procore
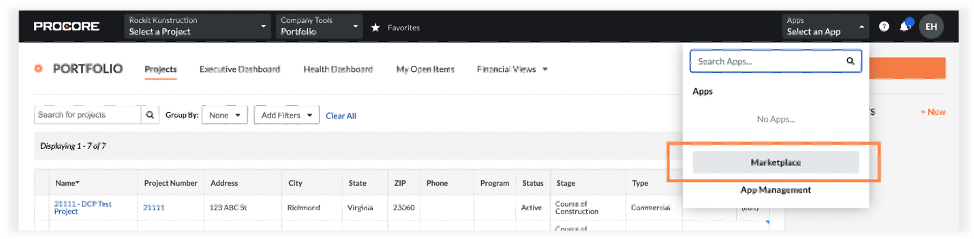
After logging in to your Procore Account, click Select an App and then Marketplace to open the Procore Marketplace directory. Search for and install the GCPay App.
Get Procore Company ID
- Login to the Procore company you want to integrate with GCPay.
- Click the Account & Profile icon at the top right-hand side of your screen.
- Select Account & Admin Settings.

- Once you are on the Account Information screen, view the URL in your browser and record the Company ID number in the URL. Record this number for future reference, as you will need it to provide it to GCPay to complete your integration setup.
- The example below shows a Company ID of 33745.

Setup GCPay Company and Get License Number
- Select Directory from the Company tools dropdown.
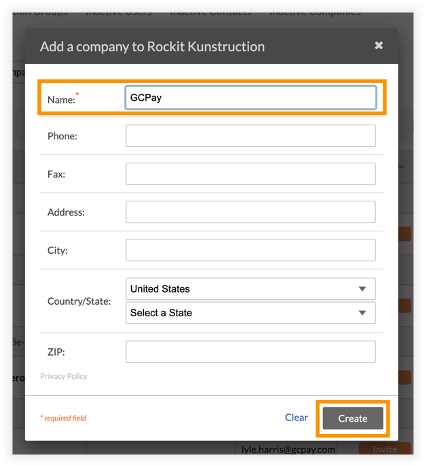
- Click + Add Company from the buttons on the right.

- Enter “GCPay” for the company name and click Create. Please ensure there are no spaces or additional characters in “GCPay”.
- Next, you need to create a license number. In another browser tab, visit this website: https://randomkeygen.com/.
- Scroll down to the 128-bit WEP Key towards the bottom of the page and click on any of the 3 strings to copy the value to your clipboard (The graphic below is for illustrative purposes - do not use one of these keys).

- Scroll down to the 128-bit WEP Key towards the bottom of the page and click on any of the 3 strings to copy the value to your clipboard (The graphic below is for illustrative purposes - do not use one of these keys).
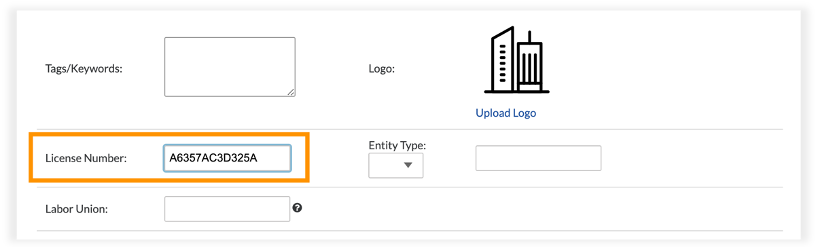
- Enter the copied key in the License Number field for the GCPay Company and click Save to save the GCPay company in the Directory.
- Provide the License Number from step 9 and the Procore Company ID from step 4 to GCPay Onboarding to complete your integration configuration.
Establish Default Contract Settings
- Select any project from the Select a Project dropdown.
- Select Commitments from the Company Tools dropdown.
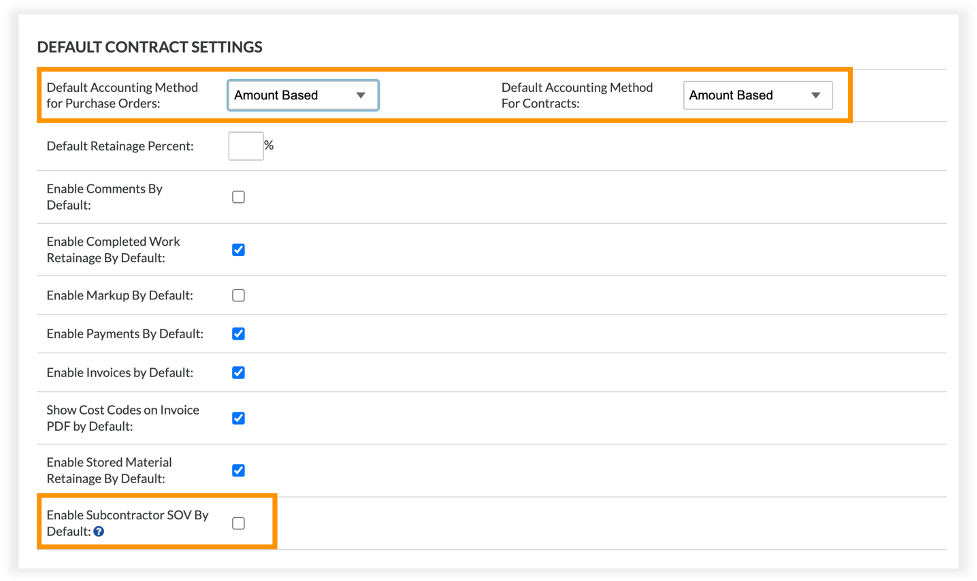
- Click the settings cog on the top left-hand side of the screen and scroll down to the Default Contract Settings section.

- Set the Default Accounting Method for Purchase Orders and the Default Accounting Method for Contracts to Amount Based.
- Uncheck the box for Enable Subcontractor SOV By Default.
LINKING PROJECTS
Grant GCPay Access to Procore Project(s)
Once a project is created in Procore, you must give the GCPay App permissions to that project before it can be pulled into GCPay.
- Click Select an App and then App Management.
- From the App Management screen, find the GCPay App and click View.
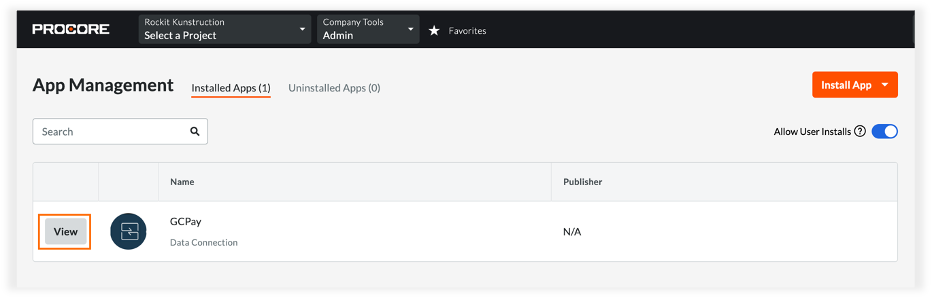
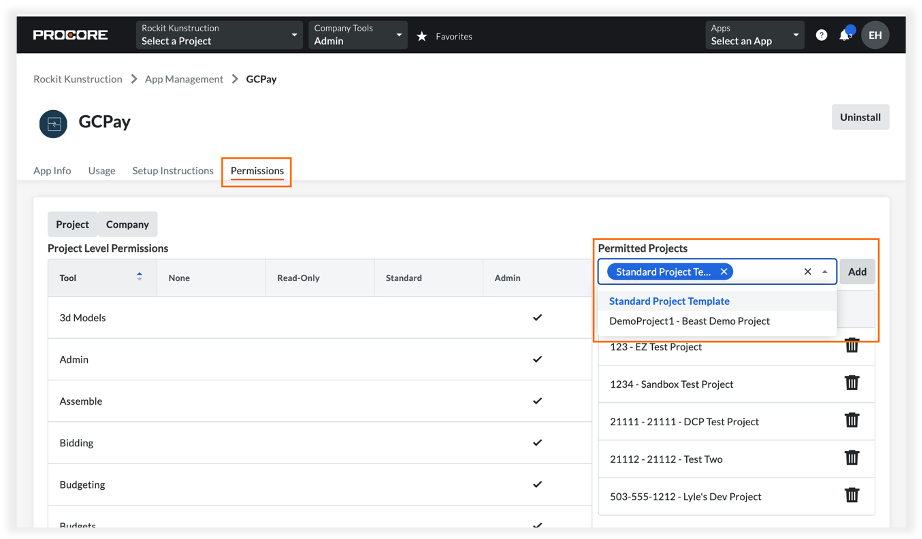
- Select Permissions from the submenu.
- Select any projects you want to see in GCPay from the Permitted Projects dropdown menu and click Add.
Create Project(s) in GCPay
Procore projects that have been added to the Permitted Projects list in the GCPay App can be used to create new projects in GCPay.
- Select New Project.
- When prompted to Link with Integration, select Yes.
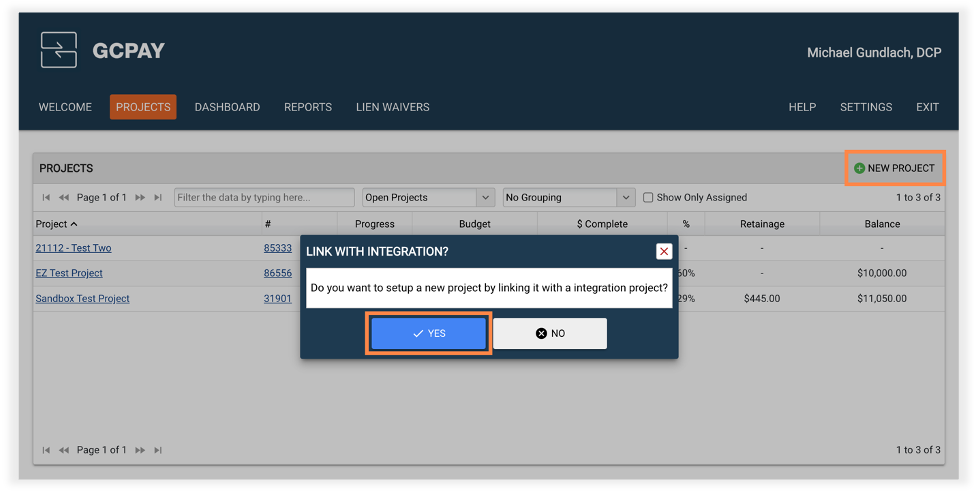
- From the project dropdown, select the project and click Okay.
- GCPay will pull relevant project data, like Project Name, Project Number, and Project Location, directly from Procore.
- You may need to enter some data yourself. All other project settings will be pulled from your company default settings in GCPay.
- Click Save to finish creating the project.
LINKING COMMITMENTS
Commitment(s) created in Procore can be used to create new SOVs in GCPay. When writing the commitment in Procore, please ensure the commitment status is Approved and Enable Subcontractor SOV is disabled (found in Advanced Settings on the commitment record).
Adding Project Companies
Project companies must be added to the project in GCPay before you can connect a commitment from Procore.
- Start by navigating to the Procore connected project and select Project Companies from the project-level navigation.
- Select Add Company from the Project Contributions table.
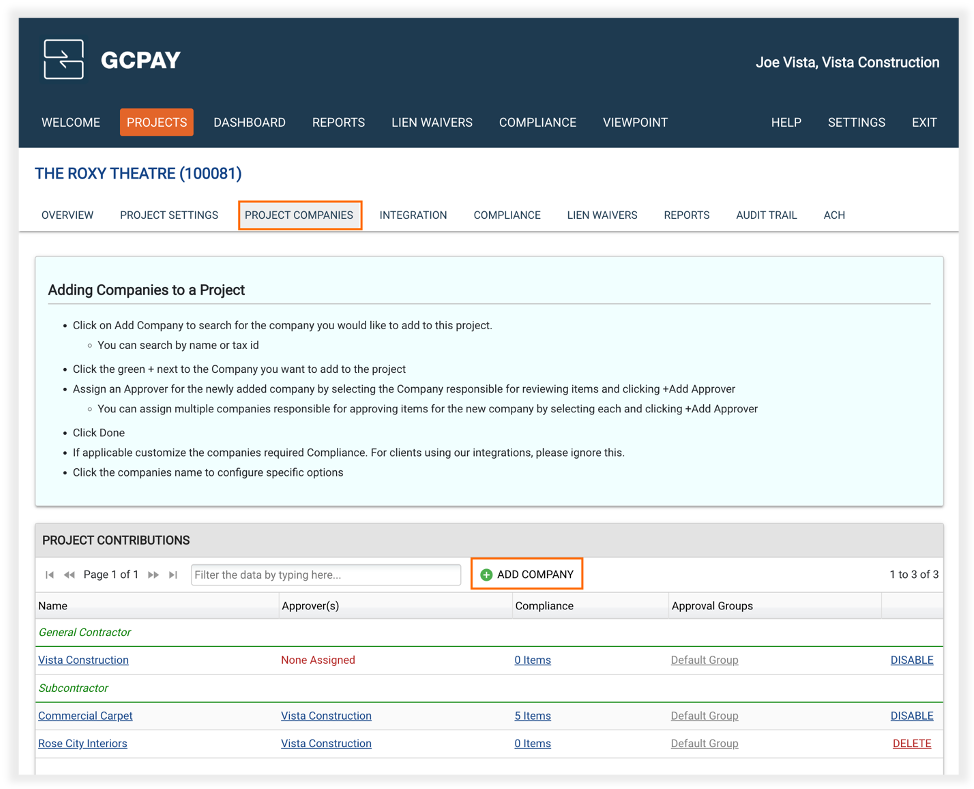
- Use the search field to find companies in the GCPay directory and click Send Invite to add them to the project.
- Check the box to Include users in search to search by a user’s name.
Linking Contracts
- Start by navigating to a connected project and select the Integration tab.
- Select Contracts from the left-hand navigation menu and click Link Contract.
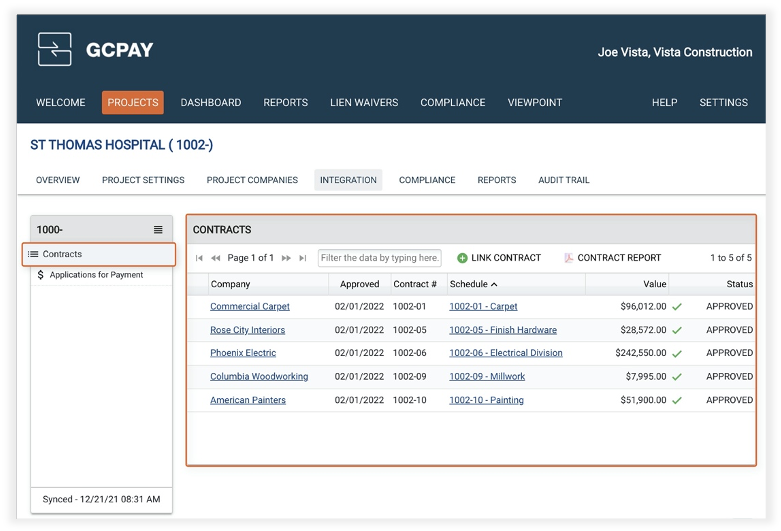
- GCPay will display a list of contracts (commitments) that have been pulled from the project in Procore. Select the contracts you’d like to add to the project and click Okay.
- You can click Auto Select Matched Contracts to automatically select contracts (commitments) that match a project company in GCPay.
- Use the following screen to map the selected contracts (commitments) to project companies.
- If you click Auto Map Contracts, GCPay will attempt to map the contracts (commitments) for you. Once you are satisfied with the mapping, click Okay.
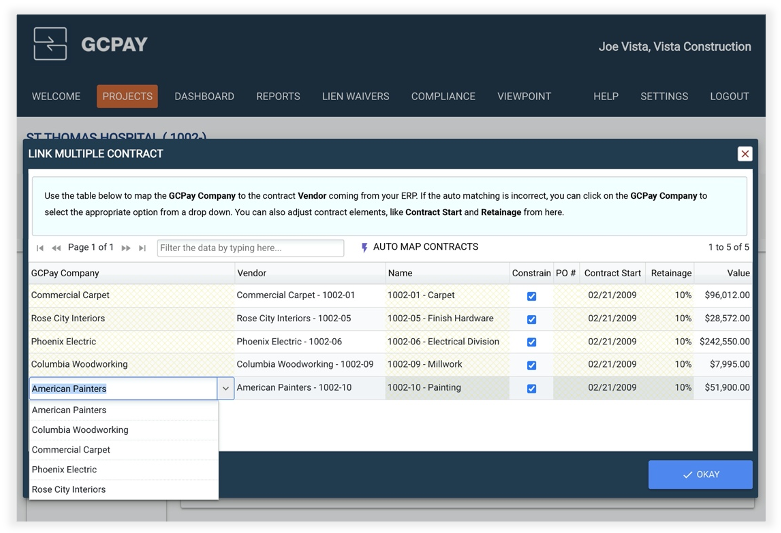
- If you click Auto Map Contracts, GCPay will attempt to map the contracts (commitments) for you. Once you are satisfied with the mapping, click Okay.
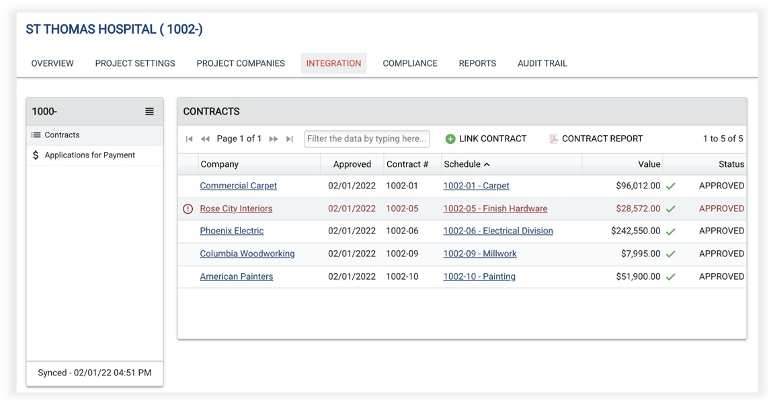
- Contracts (commitments) are now linked and will be visible in the Contracts table.
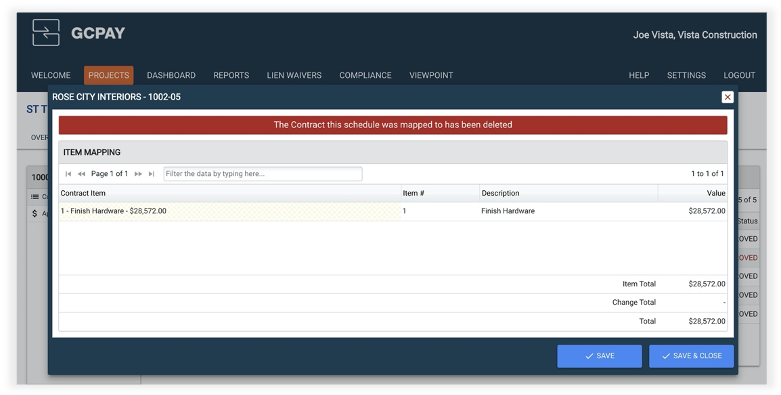
- GCPay will monitor each contract, turning the contract row red when an error is detected. Click on the contract to view error messages and item mapping.
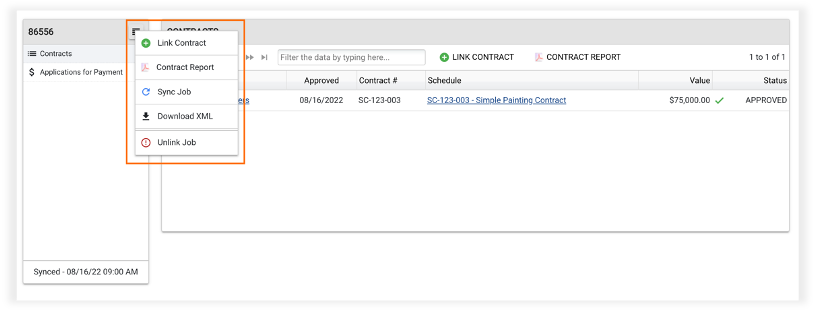
- Click the hamburger menu in the left-hand navigation menu to reveal additional integration options, like Sync Project and download the Contract Report.
Linking Change Orders
The GCPay Procore integration will see approved change orders automatically. Most users elect to pull approved change orders into GCPay automatically so that subcontractors can bill against them. GCPay automatically sends an email to subcontractors informing them an approved change order has been created and can be billed against. For more in-depth information on change orders originating from supported ERPs/PM software, see our Change Orders article.
GCPay can filter change orders to display only when they're Approved and Executed in procore. Such a filter is particularly useful for Procore users using the DocuSign integration.
EXPORTING AFPs
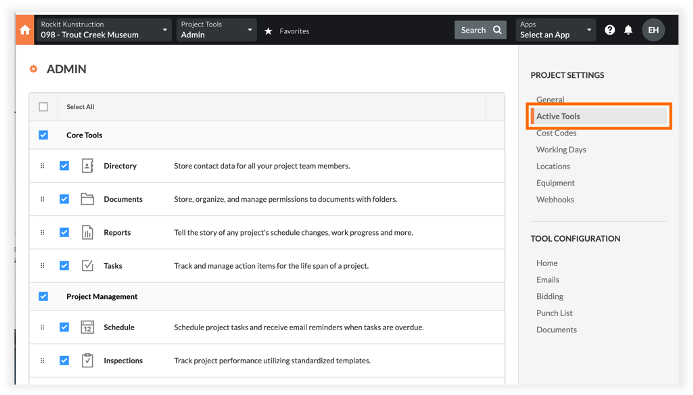
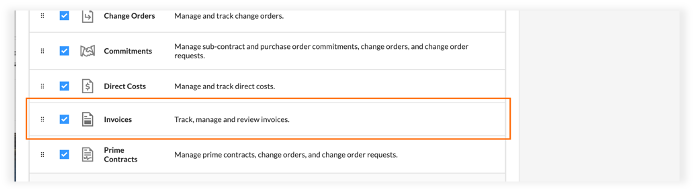
Approved applications for payment can be exported to Procore as invoices. Please ensure Invoices have been enabled in the Active Tools section of the Procore Admin Project Settings.
Approved AFPs can be exported to Procore by navigating to the Procore tab in the primary navigation or by navigating to the Integration tab on the project level menu and selecting the Applications for Payment. Both tables will present a list of approved payment applications that have not yet been exported to Procore. Select the AFPs you would like to export and click Export.
Common Errors When Exporting AFPs
- No Billing Period – Ensure that a billing period is Open in Procore for the period in which the AFP(s) fall.
- Unapproved Commitment - Ensure the commitment is in Approved status (or an a Approved and Executed status) in Procore. AFPs cannot be exported to any other status.